Friday, October 6, 2017

What are your goals in photography?

Am I a professional photographer?


10,000 hours… Malcolm Gladwell is famous for saying that we need at least 10,000 hours to learn a new skill. This is about 5 years of work and practice. I scratch my head in disbelief.

The problem is I don’t have 5 years to learn photography. I don’t want to be a professional photographer for the national geographic. I’m not hoping to be an expert. I just want to take photos that I can show off to friends and family, frame it, or hang it on my wall. Photos that I can post on social media, put hashtags, and gain hearts and likes. I just want to be a hobby photographer. I grab my camera maybe just once a week.

Fortunately, I saw Josh Kaufman’s TED talk. He says that in order to reach amateur level of a certain skill one has to practice it for only 20 hours.

Be sure to make your goals tangible and attainable. Put a time limit, if necessary.

20 hours! That’s all I need!

That’s 2-3 months of daily practice. I dust off my camera bag and prepare to take a shot.

Setting goals


Step 1: Read and research. More importantly, list down measurable goals at the end of the 20 hours.

How would I objectively say that I’ve picked up a new ability? How do I say that I have learned photography in the amateur level? I’m like a ship without a sail, a map without a compass, a sailor without direction. My solution is to list the type of shots I wanted to take in Europe as indicators of my skill.

Be sure to make your goals tangible and attainable. Put a time limit, if necessary.

You might be interested in my list so here it is:

Bokeh – shot in which the subject is in focus but the background or the foreground is blurred

Taken in our favorite bar in Budapest called "Golya".
Notice that the background is blurred compared to the main subject.

Silhouette – subject is seen as a dark shape or outline

Shot in Hong Kong airport


Natural frame – using objects, usually doors or windows, in the foreground to frame the subject

Taken in a museum in Prague, Czech Republic.
I used the old door to frame the walking tour group.

Mirror shot – shot of a subject and its reflection in the mirror

Enjoying a gelato in Rome.

Long exposure – long duration of shutter in order to clearly capture still objects while blurring moving objects

Taken in Kalvin Ter in Budapest, Hungary.
Notice how the moving cars create a streak of light while the buildings are clear.

Spiral – composing a spiral object such that it follows the Fibonacci sequence or the golden ratio

The famous spiral staircase in the Vatican Museum in the Vatican City, Italy

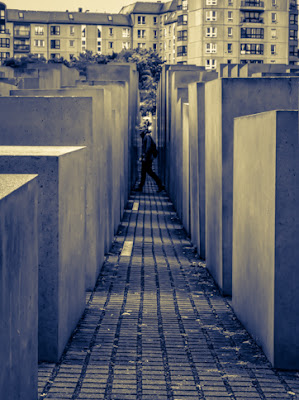
Leading lines – composing the shot so that dominant lines, such as roads or edges of buildings, lead to the subject

Taken in the Holocaust Museum in Berlin, Germany.
Notice how the concrete stelae form lines that lead to the man walking by.

Walking – just capturing subjects walking or running

Shot in the Memento Park in Budapest, Hungary.
Notice how the subject imitating the statue in the background forms a pattern.

Landscape – showing interesting features of an area, especially countryside

Taken in Budapest, Hungary showing the Parliament Building and the Danube River

As I said, this is novice stuff. I am a beginner with a long way to go before reaching the mountain's peak. I might post some tutorials regarding some of the shots mentioned above.

But for now, it’s your turn to discover Josh Kaufman’s steps 2 to 5. Grab your cameras, adjust the settings, point, and shoot!

What do you think of my list? I hope it serves as a good starting point for practice for you guys.

Watch Josh Kaufman's TED talk here.

Thursday, August 31, 2017

Why I finally got a DSLR?

Disadvantages of a DSLR

"I ain't no hipster! I don't need no DSLR!" I convinced myself since six years ago.

Include the triggers, specialized lenses, flashes, softwares, receivers, tripods, SD cards, filters, remotes, and all the other accessories you need just to make it work decently, DSLR = too expensive.

That small packet you find in shoe boxes, where it says do not swallow: silica gel. It prevents the build up of moisture. Moisture and fungus are the enemy of DSLR's and lenses. Silica gel is their friend. Also, obviously, I must not drop my new camera and lens. Treat it like a baby, must not squeeze it too tight but also must not let it fall into a ravine. DSLR = harder to take care of.

I can't just put it in a satchel. Needs at least a shockproof DSLR case. If I want to look professional, then a black camera bag. That thing with a lot of partition made of padding and extra pockets for lenses, wires, and chargers. Like a turtle carrying an entire house on its back. DSLR = bulky.

Even if they say that a mirrorless camera is not bulky, they would be lying. It is less bulky, but it is still bulky compared to a point-and-shoot camera or a phone camera. Like having a piece of rock tied around my neck as a necklace.

More convenient to take a point-and-shoot or a cellphone camera that has 10 or above megapixels in my backpack. As Chase Jarvis, a well-known photographer, would say, "The best camera is the one you have with you."

Too expensive + Harder to take care of + Bulky = DSLR

Why I finally got a DSLR

To stand in front of a landmark and take my photo with the said landmark. To say that I've been there. It's kinda like a bad vandalism, "I was here". We were going to Europe and what do you normally take photos of in Europe? Castles, churches, landmarks, etc.

In this case, a bad photo would be where the subject is either too large or too small compared to the background. I want to place the subject, either my wife or me, almost as big as the castles or churches. Phone camera won't cut it anymore. I put it back in my pocket. Wouldn't want to leave Europe with sad pictures.

Let's try an experiment:

In the pictures below, compare the relative size of the background to the subject? In other words, why is the duck suddenly larger?

Picture 1: Lens is ZOOMED OUT
producing a relatively smaller background.


Picture 2: Lens is ZOOMED IN
producing a relatively larger background

Thought that the background is larger because the woman stepped back closer to the duck? You thought wrong. She stayed in the same spot. The only difference was that the photographer, I, zoomed the lens in. Pictures were taken in Hong Kong airport, in case you were wondering.

Experiment 2: Which photo is better?


Picture 3: Lens is ZOOMED IN
producing a larger background

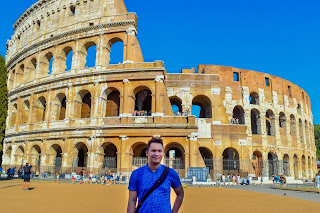
Picture 4: Lens is ZOOMED OUT
producing a smaller background.

Picture 4 is better because of the ratio between the subject and the background. We looked as big as the Colosseo in Rome, Italy. Although, using a different camera, the two pictures demonstrate the difference between zooming in and out.

This is different from just walking closer or farther. Very important to note: It's not the size but the ratio.

Zoom In = Larger Background
Zoom Out = Smaller Background


I needed a lens that zooms in and out. In photography language, this is called focal length (I only recently learned about this). This was the only reason I finally got a DSLR. Outweighed the three disadvantages listed above.

Here's a video explaining it:


Long story short, the DSLR is here now. Can't throw it away. I, at least, have to make the most of it. So here I am, blogging and learning photography.